Follow Me on Pinterest
Showing posts with label DIY. Show all posts

Thursday, November 13, 2014

Pining For Trees

I saw some wooden Christmas trees on pinterest and thought:  I can do these and I think I'll kick it up a notch, yessiree. 

I started with some scrap plywood.  I think it was from another project in which the backside of something large, hot and red needed rebuilding.
After a little measuring and a little cutting it was time to  sand and prime the plywood.  Then paint however you like.  You can use stencils of stars and other patterns; you can free-hand or you can simply white-wash them for a dramatic, wintery look.

Then it's time to drill! 
Yeah, that's the drill, baby.  She's a yellow, battery-packed hunk o' man-machine but I use her, too.  Mooorrre poweeerr...argh, argh, argh.  Oh, and that's my coffee mug on the work bench.  A girl's gotta do what a girl's gotta do!  There's nothing quite like steel and power and the smell of sawdust to make a girl's day. I have a bit which drills the perfect size hole for small, LED, battery pack, lights.  I use the 20-pack of lights and drill as many holes. 

Once the bulbs are positioned into the openings I dab a bit of glue onto the back of each light where it meets the hole (using Elmer's wood glue but I think craft glue might work).  At the end I affix the battery pack near the trunk of the tree using Gorilla glue.  That's key because other glues will dry out and turn brittle and won't hold from season to season.  Gorilla glue it is!


After the paint and glue are dry here's the final product. Shiny and bright.  Bejeweled and blinged out!  Snow Queen Elsa would melt. 


I don't have to speculate much for I know my kids will be barking up my tree hoping to nab a few of these for their holiday decor.   FIR-realllll, Mom!  And I'll be de-light-ed.

Friday, August 8, 2014

Bag Lady


I told you about the *snap* brilliant idea a had for making my own key fobs after spying one in a touristy boutique priced at $40.  It's only natural, then, I'd think the same thing about those fancy toiletries, make-up, and gadget bags.

Look at this one for $34.  This one for $40. Folks, a simple canvas make-up bag can cost easily $75 and upwards.

I know I can do these. I wanted a size I couldn't find.  A little on the large size.  My daughter saw the first one I made and thought it would fit her things quite nicely and with those beautiful eyes smiling at me I handed it over.  Quite satisfied that once again I knocked out something she wanted.  SCORE!

There are a variety of ways to make your bag.  With or without lining.  With the zipper ends hidden inside the lining or flapped out.  With the ends of the zippers notched inward or with them flared out.  Lined with Pellon fusible fleece or Heat and Bond UltraHold.  After making a dozen or so in various styles using differing materials I developed a style I like best.

 Here you'll see contrast lining and zipper.  This is a simple rectangle pouch without a broadened bottom.  Note the zipper ends are notched to angle inward.  I also used the UltraHold on this.  Ultra Hold is my favorite notion!
 Here you see a bag with the zipper ends sewn into the lining but flared outward.
 NOTE THIS BAG.  One I tried using only fusible fleece.  First mistake.  There is no firmness to this bag, it is soft and doesn't stand upright on its own.  You'll also notice the fleece bunching where the zipper ends, outer fabric and inner lining come together.  There is too much bulk for the zipper ends to meet nicely.  So fusible fleece is outta here!
 This bag is shaped like a trapezoid. That is wider at the top than the bottom.  It also has a notched bottom so that it is broader and will hold far more items.  Again, you can see the results of using the Heat and Bond. 

I looked at several patterns and do-it-yourself magazines and got a good idea of the various techniques and fabrics others have developed. But watching tutorials on YouTube were best.  Take a little time to sit through a few tutorials.  You'll see there are a variety of ways you can install a zipper and a number of ways to line your bag.  After trying several products Heat and Bond is by far my favorite notion for this project.

Here are some good tutorials:

1.  Very good visual, step by step guide to making a bag.  Grace uses iron on vinyl and a lining.  Check it out.
2.  Tutorial for simple bag.  She uses a 4 x 5 template but you can cut to any size you like.  My large bag is 10" at the top by 12" tall.
3.  Here's a tutorial including lining and interfacing.
4.  Anna Evers has a good visual DIY.  She notches the bottom and uses a plastic bag as a liner.  TIP:  Instead of using a plastic bag use the Heat and Bond. 

I'm only speculating and I'm not making this up!  My kids like them; my friends have ooo'd and aahhh'd and they are easy and zippy to make.  Seems like I've got this in the bag!


All Keyed Up

You know we spent the summer up in the Great Lakes area.  We were doing something nearly every day. From visiting relatives and old friends; to craft projects and furniture projects; to canning strawberry, blueberry and cherry jam; to welcoming my oldest into the fold for 4 days and entertaining my youngest daughter's dear friend for the last week of our stay.  We kept those young ones going so much that each time they rode in the car they nodded off to sleep.  Yes!  They did!  I have photos to prove it.

One of our excursions took us to Mackinaw City and Mackinac Island.  After the touring and walking and the afternoon tea at the Grand Hotel we took in a little shopping.  I focused in on some small, lined, zippered bags and some key fobs.

"Hey!  I can do these!"  I thought to myself.  And for pennies on the $40 price tag in those tourist boutiques.
You can do these, too.


What you'll need:
  • One 3" x 10" rectangle of fabric.  I used a medium weight canvas.
  • One 2" x 10' rectangle of Pellon 987F fusible fleece.  I found this to be a little too lightweight.  The next batch I will use a heavier weight fusible..
  • One key fob hardware set.  You can get them at JoAnne's for $.3.48 each or try ordering online here.
And here's a good tutorial on how to sew and assemble them.

I've already made 14 snazzy key fobs and it took me about 4 hours.  Talk about a nifty project with quick results!

I must be doing alright because my kids are already staking their claims and asking me to make them for friends.

I'm only speculating but I bet this item will have me singing songs in the key of life knowing my kids think they're cool!


Sunday, December 1, 2013

O Christmas Tree


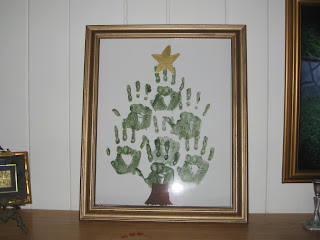
We regularly do projects together sure to sign and date each one.  Definitely sentimental!  The idea is that one day we will rummage through our things and remember the fun we had together.  That was the idea behind these Christmas tree pieces.  We'd seen a few versions on pinterest with wee little handprints.  The idea is a good one but my wee tots are grown up now.  Still I hope they will want these in their own homes one day.

To get started I rustled up some old 16 x 20 frames and painted them antique gold.  I had some 16 x 20 art canvases on hand and forest green, chocolate brown and metallic gold acrylic paint.  We used foam brushes to paint directly onto the hands and control the amount on each rather than dipping hands directly into the paint and "stamping" the canvas.  The girls had the idea of combining both their hand prints onto each canvas rather than each having their own set of prints.  *Snap*  Great idea!

Once their hand print canvas dried each girl set about topping off their tree with a hand painted gold star.

After the star dried we slid the canvas into the frame and set atop the mantle.  For now two trees rest on either side of my mantle.  One day they'll each have one of these in their own homes.

O Christmas Tree, O Christmas tree,
Your beauty green will teach me
That hope and love will ever be
The way to joy and peace for me.
O Christmas Tree, O Christmas tree,
Your beauty green will teach me.

Not so much speculation about this project.  I know we'll be making this a tradition with grandchildren some day.  And I'll see the twinkling of their little eyes all excited to get their hands painted and a gold star on their hand print tree.
 

Saturday, November 30, 2013

Pillow Talk

Not long ago a very nice cashmere sweater dress made it into the washer and then into the dryer.  You all know what happened.  No need to get into those details.  Right?

Not one to pass up a new project I figured this was the perfect chance to make a pillow.  Half way through it my daughter says:  "Ohhh Mom, I want that one.  Can I have it?"  I knew then this pillow had potential for coolness.

After cutting out the basic rectangular shape I filled it with fiberfill.  Turns out the fiberfill is too bulky so I pulled it out and opted for a silk fill.

You can see the basic gray rectangle needed pizazz.  I have seen primitive wool art pillows in high end stores all over the place.  While on a recent trip to Santa Barbara, I saw felt and wool pillows fashioned by local crafts people selling for $300. a pop!  And the store owners cannot keep them on hand.  As fast as they come in tourist folks nab them right up.  "Hey!" (I think to myself);  "I could do that, too."  So I pulled out some wool felt and cut a few shapes and ended up with this pizazziness: 

I'm only speculating but I think this pillow talks to me and I'll be using more cashmere in the near future.