Follow Me on Pinterest

Wednesday, December 4, 2013

Let's Dish!

We like to shop at Anthropologie.  So the other day when we were in Laguna we stopped in and took a look around.  My daughter spied a few items she just had to have but I was fixated on these dish towels.  The ones which particularly caught my eye were hand embroidered with a fancy, little ruffle.  Priced at $98.00 each.  I couldn't help but think...and you know where that gets me..."hey, I can do this."

So I did.

I had several cotton tea towels I had already embroidered so all I needed to do was choose some cute fabric and add a ruffle


No speculation on my part, these handy-dandy dish towels will sparkle in my kitchen and maybe even yours sometime soon!


Sunday, December 1, 2013

O Christmas Tree


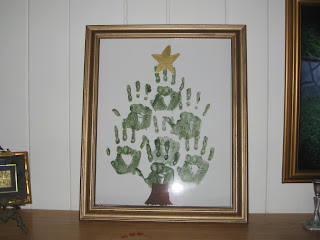
We regularly do projects together sure to sign and date each one.  Definitely sentimental!  The idea is that one day we will rummage through our things and remember the fun we had together.  That was the idea behind these Christmas tree pieces.  We'd seen a few versions on pinterest with wee little handprints.  The idea is a good one but my wee tots are grown up now.  Still I hope they will want these in their own homes one day.

To get started I rustled up some old 16 x 20 frames and painted them antique gold.  I had some 16 x 20 art canvases on hand and forest green, chocolate brown and metallic gold acrylic paint.  We used foam brushes to paint directly onto the hands and control the amount on each rather than dipping hands directly into the paint and "stamping" the canvas.  The girls had the idea of combining both their hand prints onto each canvas rather than each having their own set of prints.  *Snap*  Great idea!

Once their hand print canvas dried each girl set about topping off their tree with a hand painted gold star.

After the star dried we slid the canvas into the frame and set atop the mantle.  For now two trees rest on either side of my mantle.  One day they'll each have one of these in their own homes.

O Christmas Tree, O Christmas tree,
Your beauty green will teach me
That hope and love will ever be
The way to joy and peace for me.
O Christmas Tree, O Christmas tree,
Your beauty green will teach me.

Not so much speculation about this project.  I know we'll be making this a tradition with grandchildren some day.  And I'll see the twinkling of their little eyes all excited to get their hands painted and a gold star on their hand print tree.
 

Saturday, November 30, 2013

Pillow Talk

Not long ago a very nice cashmere sweater dress made it into the washer and then into the dryer.  You all know what happened.  No need to get into those details.  Right?

Not one to pass up a new project I figured this was the perfect chance to make a pillow.  Half way through it my daughter says:  "Ohhh Mom, I want that one.  Can I have it?"  I knew then this pillow had potential for coolness.

After cutting out the basic rectangular shape I filled it with fiberfill.  Turns out the fiberfill is too bulky so I pulled it out and opted for a silk fill.

You can see the basic gray rectangle needed pizazz.  I have seen primitive wool art pillows in high end stores all over the place.  While on a recent trip to Santa Barbara, I saw felt and wool pillows fashioned by local crafts people selling for $300. a pop!  And the store owners cannot keep them on hand.  As fast as they come in tourist folks nab them right up.  "Hey!" (I think to myself);  "I could do that, too."  So I pulled out some wool felt and cut a few shapes and ended up with this pizazziness: 

I'm only speculating but I think this pillow talks to me and I'll be using more cashmere in the near future.


Tuesday, October 15, 2013

Felt It!


The weather has cooled to a comfortable 73 degrees and my Michigan-Martha-Stewart friend would be joining me for a week of antique hunting, day trips around the south-land, swap meets, and harvest festivals.

Though we'd be walking our socks off and ending up home each night after dinner; I knew we'd have time to work in a few craft projects. < toothy grin >


My youngest had just decorated the yard and house with a harvest theme and she hung a rag-garland along the hearth.

Then I felt it!  What if I cut strips of wool felt into about half-inch by 6 inch strips and tied them onto a string of battery operated LED lights?

A quick trip to JoAnn's and a purchase of five different colors,1/4 yard-each, of suit-quality, wool felt and I was ready to experiment.


Sunday, September 15, 2013

Farmhands


We did it!  My friends who joined me for a class with Shelly Andrade at Shizzle Design this summer also joined me at the Country Living Magazine Art, Craft, and Antique Fair. Out in a field, wide open, green space wherever we looked.  And we were like farmhands tending our wares!  Buying vintage fabrics; negotiating the price of a rocking chair; meeting and greeting artisans from all over the U.S.  We loved it and we will go again next year.


Here we are post event.  You can see we are very happy about the experience.  There was a good mix of art, antiques, repurposed and upcycled items. 


Held at historic Ohio Village, a re-creation of a mid-1800s county seat, lies just outside downtown Columbus.
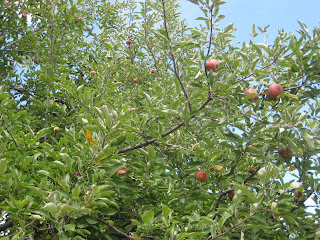
In the midst of an apple orchard.
 
Pumpkins, gourds, squash creatively displayed and lurking around corners..
  Met Cari Cucksey from Cash and Cari and the RePurpose Shop.  The queen of turning old into sold.  

And most importantly fun, creativity, laughter and bonding with girlfriends!

There's no speculating, we're going back next year!
.


Saturday, September 7, 2013

Sleep Aid

The summer temperatures are reaching 107 degrees with 76% humidity.  If I'm going to sleep, the air conditioning will be set at 76 degrees and I'll be wearing a t shirt to bed.  Still even that's been a little uncomfortable so I thought I would check the closet where I keep my fabrics and patterns and whip up some pajamas.

I ended up making two sets of pajamas; a night gown; and two pair of shorty pajamas.
I'm only speculating but I think the shorty pajamas are dreamy.  I'll sleep on it!

Sunday, September 1, 2013

No Sugar Jam Making

You can see by the posts I've published that I've been making jam.  The amount of refined sugar in each batch makes me wince.  I want fresh fruit spread.  I want berries and only berries in my jam.  So I set out on a quest to find different recipes.  I kept wondering what did jam-makers do before refined sugar, packaged pectin, and freezers.  I wanted to can jam that was healthy and tasty!  I kept toying with one recipe after another.  I then saw an episode of The Barefoot Contessa where Ina Garten explained that Granny Smith apples were high in pectin and could be used to make jam.  Now that's a piece of information I could use!

I searched all over the internet looking for no-sugar recipes only to find sugar substitutes.  I didn't want that either.

Last week I was laying in bed thinking about jam making and just knowing there was a way to make what I wanted.  *SNAP* Hey, I have several very old cookbooks.  I knew I had books from the 30s and 40s.  Surely they would have a recipe.  And they did.  More importantly these cookbooks explained how to make jam.  Three keys to making sugarless jam are:
1.  cook the berries until they thicken, today we call that reducing the mixture
2.  add one peeled, cored, shredded green apple per 3 cups of berries; and
3.  boil in a water bath for 60 minutes.

This differs from today's canning recipe in that
1.  we add liquid or powder pectin instead of granny smith apples;
2.  we boil the berries with 7 to 8 cups of refined sugar for about 10 minutes...the sugar reacting with the liquid pectin results in thickened jam; and
3.  we can the jam in a water bath for about 10 minutes.

You can see the old fashioned way takes a lot more time.  That's all...just time.

So here's my Raspberry Jam recipe (I double the batch):

In a large pot combine:
8 cups fresh, clean raspberries
1 large or 2 small granny smith apples--peeled, cored finely shredded)
juice of 1/2 lemon
2 cups organic honey or agave syrup
1 T. butter

Bring all ingredients to a rolling boil for at least 20 minutes.  From this point watch closely and boil until mixture reduces and thickens and coats the back of a spoon.  Should be about 230 degrees on a candy thermometer.

Once you've reached this point you can the berries in sterile jars as you would any other jam except that you boil in a water bath for 60 minutes instead of the 10 minutes most of today's recipes instruct.

Only speculating but I think those ladies from the 30s and 40s preserved the best recipes for jam making.  And I think I'll be sleeping soundly tonight knowing the jam in my pantry has no refined sugar!

Wednesday, August 28, 2013

Ah-love it!

I had this silver tray tucked away.  I think it's an olive serving tray.

The creative juices were flowing so I propped it up on a plate stand and pondered for a few more seconds.  Grabbed the tray and off to the garage I went.  (Tutorial here)  Next I reached for a can of silver spray paint, my trusty paint cloth and out to the yard I went.  After a couple coats of silver spray paint to both the tray and plate stand I was ready to tape off the edges.  Then back into the garage I went; found the can of chalkboard paint and a foam brush and applied three coats to the tray. 

Only speculating of course but this beats a tray of olives any day.  Ah-love it, for sure.

Tuesday, August 27, 2013

Her Kitchen Aid

You probably know by now, that we've got a budding gourmand in the house.  Not only does she like to make lavish dinners; try new techniques; and has her own subscription to a cooking magazine but she will bake anything.  While I will look at a recipe and see more than three steps and nix it right there she will see a twelve step recipe and  mix it right up.

So you can imagine when we brought home this cobalt beauty the kitchen became kid central!  Six quarts of culinary madness.  She hums like a bow sliding across a Stratavarius.  Works like a team of those Budweiser Clydesdales!  She's a gem and my daughter admires this piece of culinary artistry longingly.  I bet she would take it to her room and place it on her nightstand so the first thing she sees each morning is the epitome of kitchen work horses!  Ok, maybe not that bad but you get the idea.  She's on cloud nine.

It took her about a nano second to decide on her first work of art:  homemade, triple chocolate brownies.

Mmm-mmm good.

Yesterday she hopped out of bed; eyes still half-lidded and headed right for the refrigerator.  "I'm making biscuits" she proclaimed.

And she did.  And they came out perfectly.  Topped with freshly made jam.

I'm only speculating but I think my daughter's new aid in the kitchen will result in a mix of baked goods for years to come.  Thankfully my sweet neighbors love being the beneficiary of the bounty!


Monday, August 26, 2013

Ice, Ice, Baby

I picked up a couple of those basic ice cream makers.  I figured one ice cream maker wouldn't make enough ice cream to serve guests so....I got two of them.

Followed the directions perfectly.  Made the custard.  Used vanilla beans.  Ghirardelli chocolate pieces.  Fresh cream from the local dairy.  Yep, we went all out.  This was going to put Haagen Daz and Ben and Jerry's to shame.

You can imagine my dismay when what we ended up with tasted something like an omelet.   With 6 eggs in the ice cream base ...  how could it taste like anything other than eggs?

Ok, I admit.  Not every new project turns out perfectly but we had good fun in the kitchen. 

All I can say is bring back Ben and Jerry's White Russian!


I'm only speculating but I think our attempt at ice cream making got the big chill!

Sunday, July 28, 2013

Shizzle Design

That's the talented and creative Shelly Andrade of Shizzle Design (second from right).  And with her are the three of us enjoying her class for painting, waxing and distressing techniques with Ce-Ce Caldwell paints

About a year ago I was online looking for non toxic paints.  I came across Shelly's story:  the one about  her doctors advice and her change to Ce-Ce Caldwell paints.  Shelly is not kidding when she says CCC paint is not toxic and has no odor!  We painted our items right in her living room.  She blanketed her furniture and set up work benches for us and yes-sirree, we did paint inside her home!  The only aroma filling the air was the pizza she ordered for lunch.

Equally she is not kidding that this was the easiest painting I've ever done.  I just could not wrap my head around it though.  When we signed up for Shelly's class she repeatedly told us not to do any sanding.  No prep work? < puzzled smirk >  How could that be?  I could not dismiss years of ingrained insistence that any top-notch painted project rests on how well one completes the prep work.  The idea that there is no need to prep when using CCC paints did not compute in my brain!  A product as easy to use as Shelly had been telling me (and non toxic to boot) would yield a professional looking finish--I'm all in!  Still at 9 PM the night before the class, I grabbed my girlfriend and our pieces of furniture and insisted we do the sanding. Until Shelly's class my friend would do anything I told her to do.  That's not the case anymore.
< heavy sigh and a wink >.
You can see that buffet in the background.  That's another story for another post.  It's beautiful isn't it?  Good bones and just needing that right re-do with Ce-Ce Caldwell paints and aging wax!  Check back on this blog for a tutorial on what happens to that buffet!

On the drive down to Shelly's place I'm still yammering about the prep work.  "Imagine NOT sanding or removing the sealer from the surface so that the chalk paint can stick"  I marveled incredulously.  My girlfriend listened intently but said:  "You know if this paint is all Shelly says it is, it will transform our lives."  I think she's right.  It's just that awesome!
 
The base of the square table above, had an original coat of dark green.  You can see that with only the first (base) application of a very light blue, almost white, coat of CeCe Caldwell paint the coverage is impressive.  The small, mahogany,  pedestal table (on the right) has a base coat of green.  Over the Kentucky Mist green is a buttery, Johnston Daffodil, yellow (see below).  One of Shelly's distressing techniques calls for many layers of color along with the wet distressing application, finalized by a coat of aging wax.  In order to speed up the drying process between coats we used a small fan or blow dryer.

After only 4 hours both our projects were done and looking...well...looking just short of breathtaking and miraculous!
 
 I'm only speculating but our decision to start using CeCe Caldwell paints and signing up for Shelly's top-notch, painting class was a stroke of pure genius.